
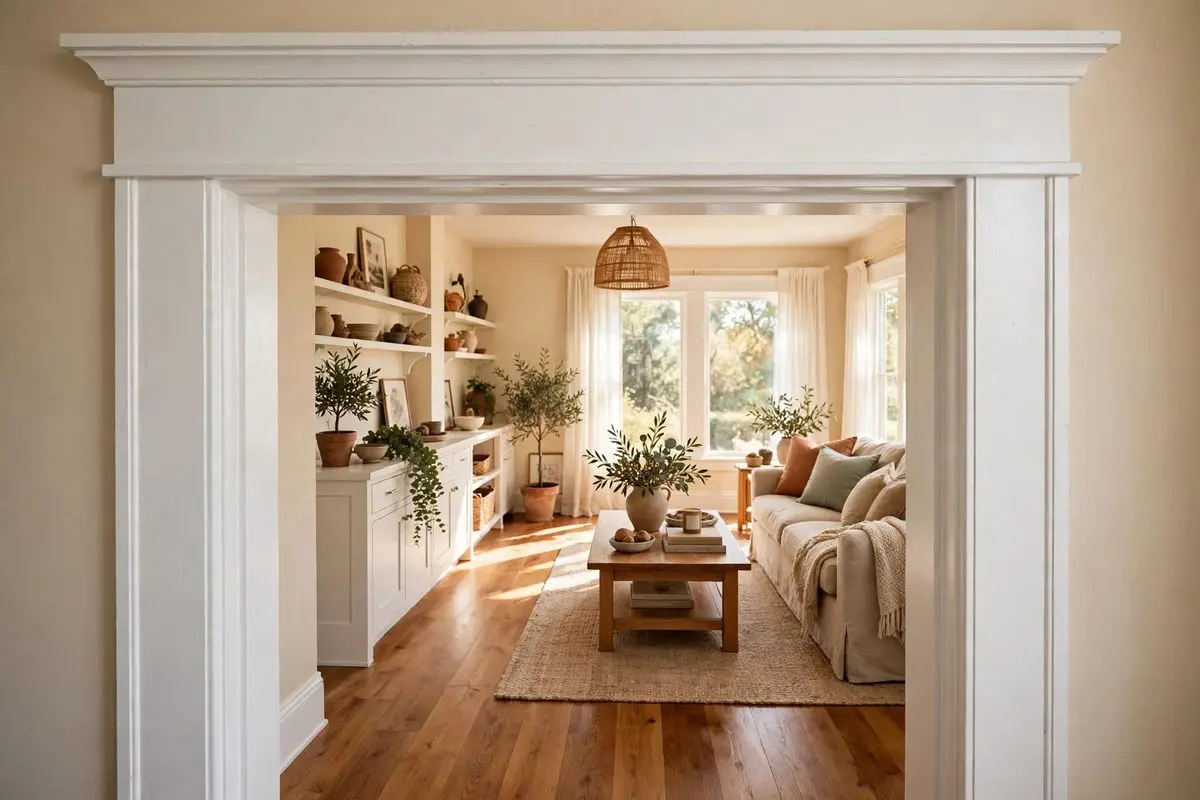
Door casing is the trim that frames an interior door, covering the gap between the door jamb and the wall. It looks like a small detail, but the casing style you choose — Colonial, Craftsman, farmhouse, modern flat — quietly decides whether a room feels traditional, clean, historic, or dated.
In most Central Illinois homes, one of a handful of profiles does all of this work, often without the homeowner ever choosing it on purpose. This guide walks through the eight interior door trim styles that matter, how to size them, which materials hold up, what they cost installed in the Pekin area, and how to match new casing to the home you already have. Whether you are updating one doorway or planning trim as part of a larger remodel, this is the decision laid out the way a finish carpenter sees it.
Key takeaways
- Most casing is 2.25″–3.5″ wide; Craftsman and farmhouse packages run 4″–5.5″.
- Match the casing to your home’s era — and run one profile family through the whole house.
- A standard door needs about 20 linear feet per side (~40 ft cased both sides).
- Paint-grade casing runs about $125–$300 per door side installed in Central Illinois.
What Is Door Casing?
Door casing is the decorative trim installed around the inside edge of a door frame. Its practical job is to hide the rough gap between the door jamb and the drywall. Its design job is to give the doorway a finished, intentional edge — the same way a frame finishes a picture.
A standard casing installation has three pieces: two vertical legs on the sides and one head piece across the top, cut and joined at the corners. Casing is part of a home’s overall trim package, which is where most of the confusion starts. Homeowners use “casing,” “trim,” and “moulding” interchangeably, and even contractors are loose with the words, but the terms do point at different things:
| Term | What it is | Where it goes |
|---|---|---|
| Casing | The trim that frames a door or window opening | Around doors and windows |
| Trim | The general word for all finish moulding in a room | Everywhere — casing, baseboard, crown |
| Baseboard | The trim at the bottom of the wall | Where the wall meets the floor |
| Door frame / jamb | The structural frame the door slab hangs in | Inside the doorway itself |
| Moulding | The manufactured profile itself, before it is installed | Sold by the linear foot at the lumberyard |
The distinction that matters when you are shopping or talking to a contractor: the frame is structural, the casing is the finish. When people say they want new “door trim,” they almost always mean casing.
8 Door Casing Styles
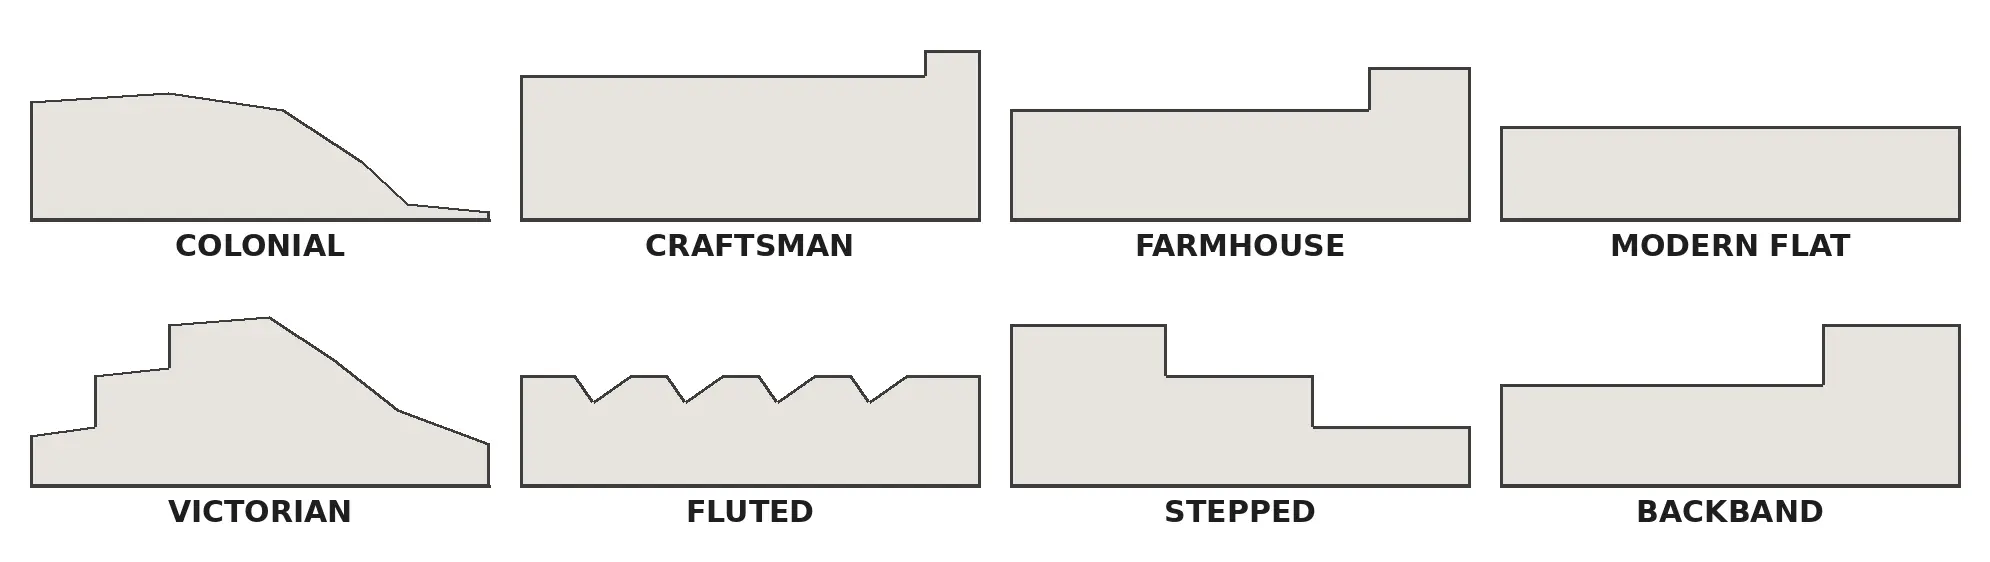
Every casing style below is a profile — a cross-section shape milled into the wood — plus a width. Small changes in that profile completely change the character of a doorway. These are the eight styles worth knowing, in roughly the order you will meet them in Illinois homes.
1Colonial Casing
Colonial is the most common casing profile in American homes, and if your house was built between roughly 1940 and 1990, there is a good chance this is what is on your doors right now. The profile has a curved, S-shaped ogee edge that rolls from a flat face into a rounded bead. The best-known version, often sold as profile WM356, is about 2.25 inches wide, though wider Colonial profiles run to 3.5 inches.
Colonial reads as traditional without being formal, which is why builders used it for decades. It paints beautifully, hides minor wall imperfections better than flat profiles, and is stocked everywhere, so matching existing Colonial casing in an older home is usually easy. Many 1950s–1980s ranch homes have its plainer relative, clamshell (or ranch) casing: a narrow profile with a soft, rounded face and no decorative bead.
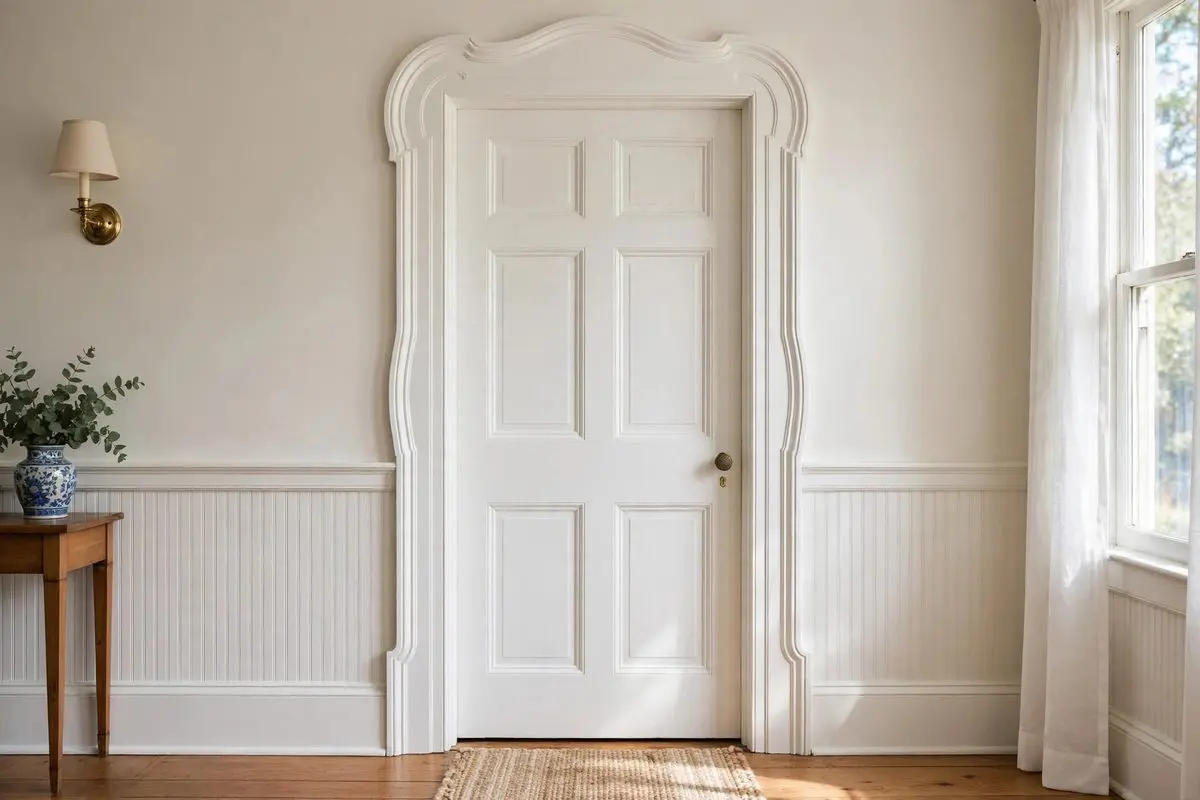
Best for Traditional and postwar homes; matching existing trim in mid-century houses.
2Craftsman Casing
Craftsman casing is built from flat stock — simple boards with square edges — usually assembled from a 1×4 or 1×6 leg, a slightly wider head piece, and sometimes a thin cap on top that projects a fraction of an inch. There are no curves. The look is honest, sturdy, and architectural, and it comes straight out of the Arts and Crafts bungalows of the early 1900s.
Because it is made from flat boards rather than a milled profile, Craftsman casing is easy to widen: a 5.5-inch version makes a strong statement in rooms with tall ceilings. It is also the style most associated with quality trim carpentry today, and it is the profile we install most often in whole-home renovations where the homeowner wants the trim to feel like part of the house’s structure.
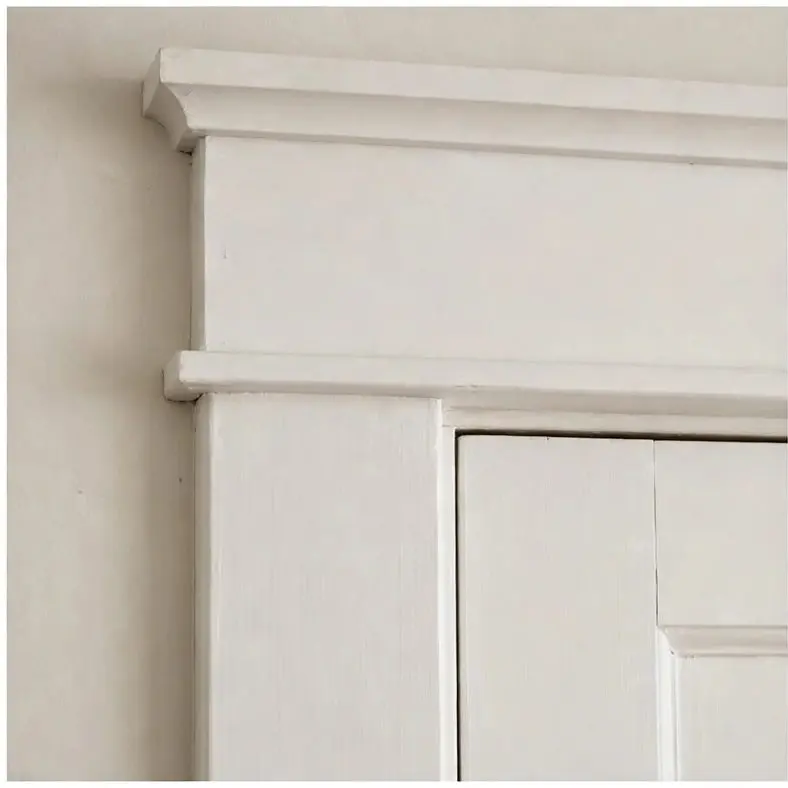
Best for Craftsman and bungalow homes, farmhouse interiors, and any remodel aiming for built-to-last character.
3Farmhouse Casing
Farmhouse casing is Craftsman’s relaxed cousin: wide, flat boards — typically 3.5 to 5.5 inches — with a backband, a second narrower strip applied to the outer edge that adds depth and a subtle shadow line. Where Craftsman casing is precise, farmhouse casing is generous and a little rustic.
The width is the point. Farmhouse casing gives doorways presence in open, casual spaces, and it pairs naturally with the wide-plank floors and simple cabinetry of modern farmhouse design. In new trim packages it is often paired with matching wide baseboards to keep the proportions consistent.
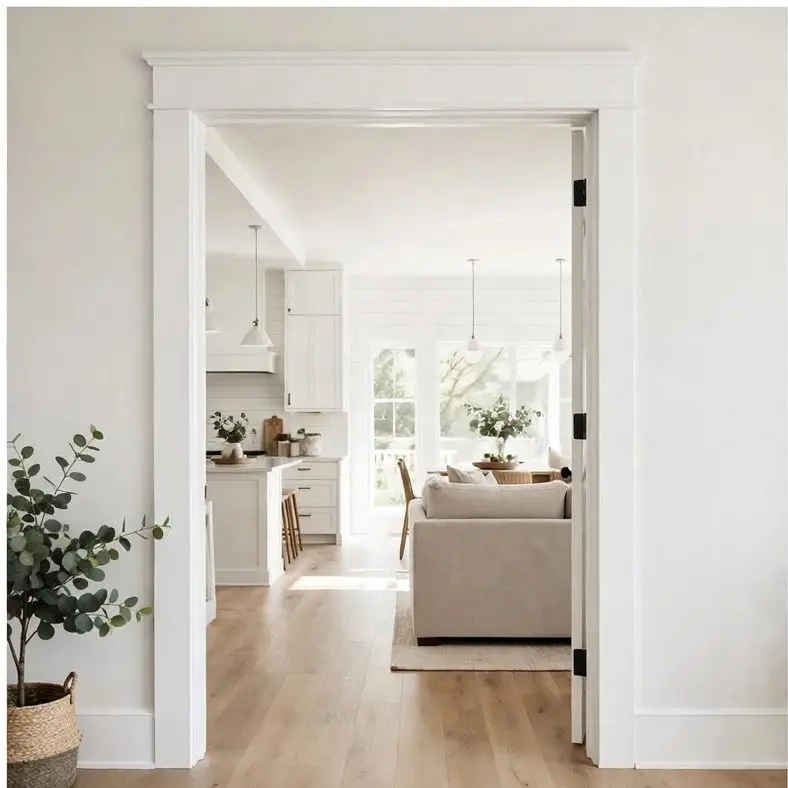
Best for Farmhouse and modern farmhouse homes, open floor plans, rooms with high ceilings.
4Modern / Minimalist Flat Casing
Modern casing strips the profile down to almost nothing: a flat board with a square or very slightly eased edge, usually 2.5 to 3.5 inches wide, installed with tight mitered corners and painted to disappear into the wall — or, in bolder interiors, painted a contrasting color so the doorway reads as a clean graphic outline.
At the far end of this style is the trimless look, where the jamb is finished flush with drywall and there is no casing at all. That version requires the drywall and framing to be planned around it from the start, so it belongs in new construction and full renovations rather than trim-only updates. For most homes, flat casing gets 90 percent of the modern look at a fraction of the effort.
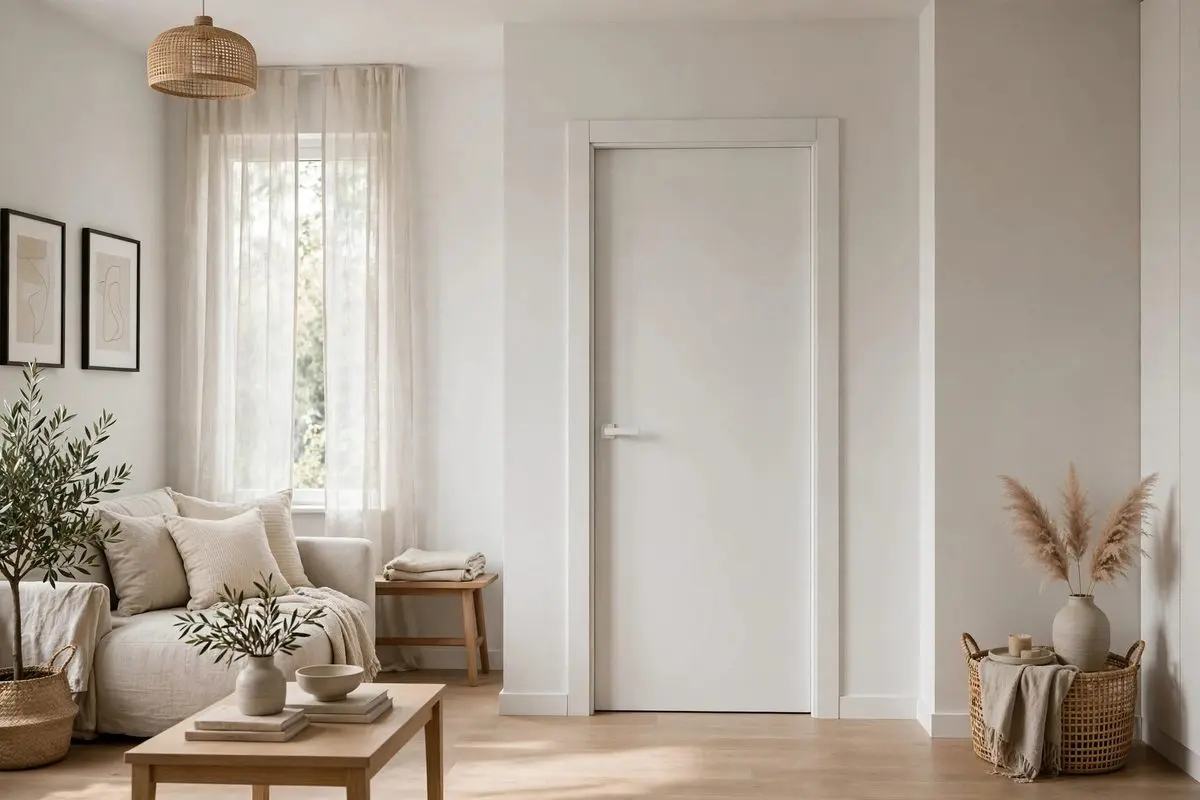
Best for Contemporary and Scandinavian-influenced homes, condos, and minimalist remodels.
5Victorian / Ornate Casing
Victorian casing is the most decorative of the group: tall, detailed profiles — often 4 to 6 inches wide — built up from layered mouldings, fluting, and corner blocks carved with rosettes. In genuine Victorian-era homes the casing was furniture for the doorway, meant to be noticed.
True ornate casing is less common in Central Illinois than on the coasts, but Pekin and Peoria both have older housing stock where detailed trim survives, and reproducing it is a real finish-carpentry skill: profiles are often built up from two or three stock mouldings because no single modern profile matches the original. If your older home has ornate casing worth keeping, repair and replication usually beats replacement.
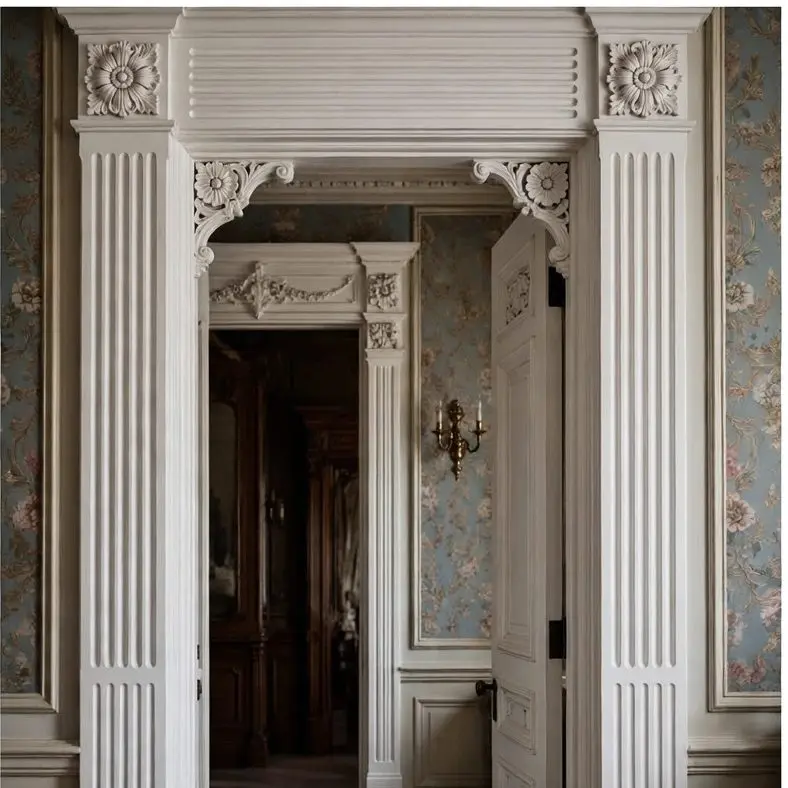
Best for Historic and Victorian-era homes; formal rooms where trim is a feature, not a background.
6Fluted & Reeded Casing
Fluted casing carries a series of vertical grooves along its face; reeded casing carries the matching raised ribs. Both come from classical Greek and Roman columns, and both read as formal and architectural without the full ornament of Victorian trim. Fluted casing is frequently paired with rosette blocks at the corners and plinth blocks at the floor, which eliminates difficult miter cuts and adds to the classical effect.
This is a strong choice in dining rooms, entryways, and primary suites where you want the trim to have presence but the house itself is traditional rather than historic.
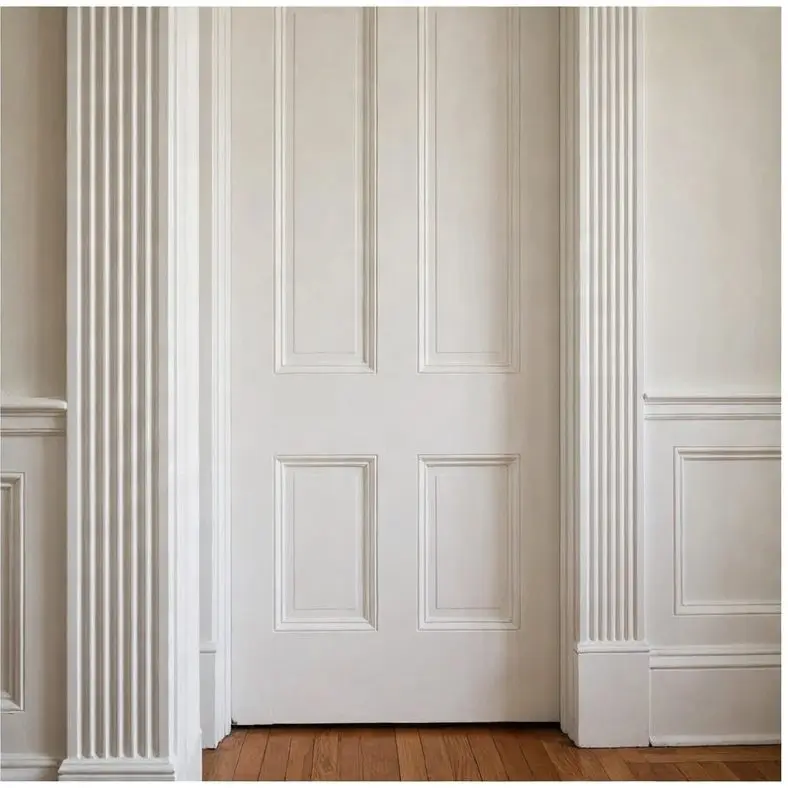
Best for Formal traditional homes, entryways, and rooms with classical details.
7Stepped Casing
Stepped casing has a profile that steps down in two or three flat levels from the wall to the door edge. It sits between traditional and modern: more detail than a flat board, less curve than Colonial. That in-between quality is exactly why it shows up in so many transitional homes, where the kitchen and cabinets are neither fully traditional nor fully contemporary.
Stepped profiles are widely stocked, come in several widths, and are a safe, current-looking choice when a homeowner wants to update Colonial casing without committing to a strong style direction.

Best for Transitional homes and remodels that blend traditional layout with updated finishes.
8Backband Casing
Backband is not quite a style of its own — it is an upgrade you add to one. A backband is a narrow strip of moulding applied to the outer edge of a flat casing, standing slightly proud of the face. It makes standard casing look wider, deeper, and more custom, and it is one of the most cost-effective tricks in finish carpentry: a plain 3.5-inch flat casing with a backband reads like a 4.5-inch custom profile.
Backband is also a problem-solver in older homes, where it can cover the ragged outer edge of existing casing or bridge the visual gap when new casing meets old plaster walls.

Best for Upgrading stock flat casing, farmhouse and Craftsman packages, and older homes with imperfect walls.
Mitered vs Butted Joints — and the Blocks That Finish Them
How the corners join changes a casing’s whole personality, and there are only two ways to do it.
A mitered joint cuts both pieces at 45 degrees so the profile wraps around the corner. Miters are the right choice for any profiled casing — Colonial, stepped, fluted — because the profile’s curves have to flow around the corner to look correct. A good miter on painted casing should be nearly invisible; a bad one opens into a dark wedge-shaped gap every winter as the wood shrinks, which is why miter quality is one of the clearest tells of careful finish work.
A butted joint runs the head piece straight across and butts the legs into its ends, with square cuts all around. Butted joints only work with flat stock — Craftsman and farmhouse casing — where there is no profile to wrap. Done well, with the head slightly overhanging the legs and a cap on top, the butted joint is not a shortcut; it is the historically correct Craftsman detail, and it is more forgiving of the seasonal movement in older houses.
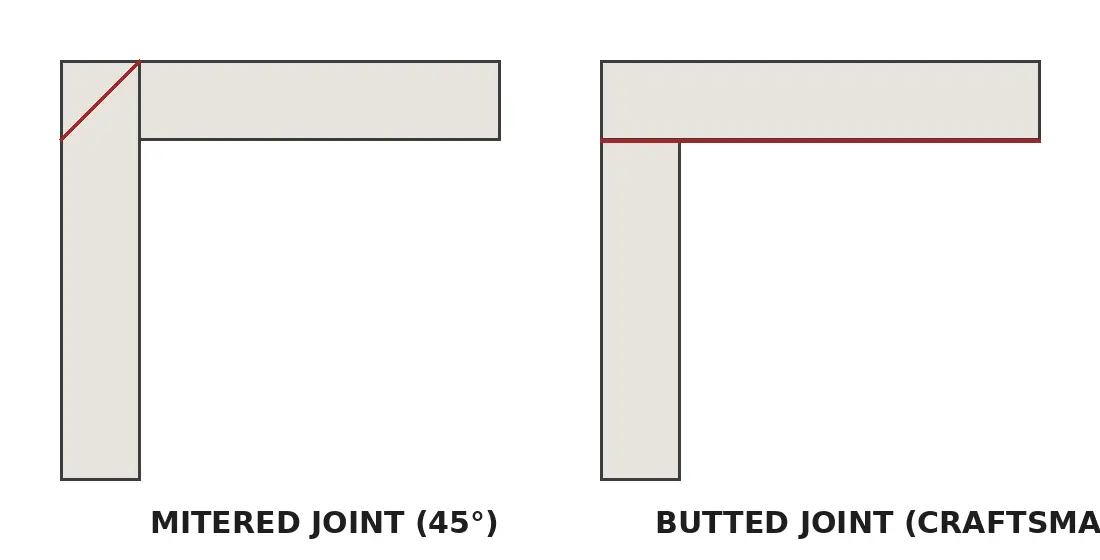
| Joint | How it looks | Works with | Watch out for |
|---|---|---|---|
| Mitered | Profile flows around the corner at 45° | Colonial, stepped, fluted, most milled profiles | Gaps opening in winter if cut or glued poorly |
| Butted | Square, architectural, head overhangs the legs | Craftsman, farmhouse, modern flat stock | Looks wrong with any curved profile |
Two classic add-ons finish these joints. Rosette blocks are square decorative blocks — often carved with a flower or bullseye — placed at the top corners. They let the legs and head run straight into the block with no miter at all, which is why Victorian and fluted packages use them. Plinth blocks are thicker blocks at the base of the legs, where casing meets baseboard; they give the casing a grounded, furniture-like foot and solve the awkward transition where casing and baseboard profiles collide.
Door Casing Sizes: Width, Proportion, and the Reveal
Standard casing widths run from 2.25 inches to 3.5 inches. Wide Craftsman and farmhouse packages go to 4–5.5 inches, and Victorian profiles can reach 6 inches. Bigger is not automatically better — casing has to be in proportion to the door, the ceiling, and the baseboard it lives with.
2.25–3.5″
Standard casing width
1/8–3/16″
Typical reveal on the jamb
~20 ft
Casing per door side, incl. waste
Three rules cover almost every sizing decision:
- The baseboard rule. Casing and baseboard should look like family. As a working rule, the baseboard should be equal to or slightly wider than the casing’s visual weight — a common pairing is 3.5-inch casing with 5.25-inch baseboard. Pairing skinny 2.25-inch casing with tall 7-inch baseboards makes the doors look underdressed.
- The ceiling rule. Taller rooms carry wider trim. Use the table below as a starting point.
- The reveal rule. Casing is not installed flush with the jamb’s edge. It is set back by a small margin called the reveal — typically 1/8 to 3/16 inch — which creates a deliberate shadow line and hides the fact that no wall or jamb is perfectly straight. A consistent reveal around all three sides is another mark of careful work.
| Door height | Ceiling height | Recommended casing width |
|---|---|---|
| 6’8″ (standard) | 8 ft | 2.25″ – 3.25″ |
| 6’8″ (standard) | 9 ft | 3.25″ – 4.5″ |
| 8’0″ (tall) | 9–10 ft | 3.5″ – 5.5″ |
| Any, historic home | Any | Match the original — often 4″ – 6″ |
One quantity worth knowing before you shop: an average interior door takes about 20 linear feet of casing per side (two legs and a head, with cutting waste) — and because interior doors are cased on both sides, that is roughly 40 linear feet per door. Whole-house estimates go wrong when this number is guessed instead of measured door by door.
Door Casing Materials: The Paint-vs-Stain Decision
Casing material decides two things at once — what the trim costs, and whether it gets painted or stained. Decide the finish first, because paying for stain-grade wood you then paint is one of the most common small wastes in a trim budget.
| Material | Best for | Strengths | Weaknesses |
|---|---|---|---|
| Paint-grade pine / poplar | Painted casing, most homes | Affordable, smooth, easy to work; poplar takes paint exceptionally well | Dents more easily than hardwood; grain is not worth staining |
| MDF | Painted casing on a budget | Cheapest, perfectly smooth, no knots or warping | Swells if it gets wet — keep out of bathrooms and exterior doors; cannot be stained |
| Stain-grade oak, walnut, cherry | Stained casing in traditional and Craftsman homes | Beautiful grain, hard and durable | 3–5× the material cost of paint-grade; every joint and filler line shows |
| PVC / composite | Bathrooms, exteriors, damp areas | Will not rot, absorb water, or feed mold | Limited profiles; must be painted; feels less substantial |
The practical rule: paint-grade for painted trim, stain-grade only when the wood itself is the feature. In most Central Illinois remodels, that means poplar or pine casing painted to match the rest of the trim package, with stain-grade reserved for a Craftsman home where the woodwork is part of the architecture.
Matching Casing to Your Home
The most common casing mistake is choosing a style in isolation — a beautiful profile that fights the house around it. Casing belongs to the home’s era and architecture, and matching that is more important than any individual preference.
- Pre-1940 homes. Expect wide, detailed trim: fluted or built-up profiles, rosettes, plinth blocks. If original casing survives in part of the house, match it rather than modernizing it away — in older Pekin and Peoria homes, original trim is part of what gives the house its value.
- Craftsman bungalows. Flat stock with a cap, in the 3.5 to 5.5-inch range, painted or stained. Anything with an ogee curve will look imported.
- Postwar ranch and 1950s–1990s homes. Expect Colonial casing or its simpler cousin, clamshell (ranch) casing — a narrow, roughly 2.25-inch profile with a gently rounded face that is everywhere in Midwest ranch homes. Keeping that profile — or upgrading it to a slightly wider Colonial or stepped casing — preserves the home’s character and saves the cost of re-trimming rooms you are not remodeling.
- Newer and transitional homes. Stepped profiles and modern flat casing fit the cleaner cabinetry and wider doorways of newer construction.
Two consistency rules apply everywhere. First, run one casing family through the whole house; mixing profiles room to room makes even good work look patched together. Second, let the detail step down, not change: the front entry gets the full treatment, hallways the same profile, and closets and secondary rooms can go simpler or narrower — the same family at a smaller scale.
And when an exact match for existing casing cannot be found — a common problem in homes more than a few decades old — there are three honest options: have the profile custom-milled (worth it for a whole visible room), use a backband to bring a close stock profile up to the original’s depth, or re-case the full room so the mismatch disappears at a doorway instead of in the middle of a wall.
Exterior Door Casing: Different Rules
Exterior casing does the same visual job, but it works in weather, so the rules change. It is usually wider, it must shed water rather than trap it, and material choice matters more than profile: PVC and fiber-cement casing will not rot, quality treated or naturally durable wood holds up with maintenance, and standard MDF or finger-joint pine will fail outside no matter how well it is painted.
In Central Illinois, freeze-thaw cycles work water into every unsealed joint, so exterior casing lives or dies on caulking, flashing at the head, and paint maintenance. If your front door casing is soft at the bottom corners, that is rot starting at the end grain — a repair worth catching before it reaches the jamb and threshold. Our window and door replacement team handles exterior trim as part of that work.
What Professional Installation Involves
Casing looks simple — three boards around a door — which is exactly why the difference between average and excellent work is so visible. Walls are never perfectly flat, jambs are never perfectly plumb, and casing shows every bit of it. Professional installation is mostly the discipline of hiding those facts.
It starts with measurement and the reveal. Each leg and head is measured against its actual opening, and the reveal — that consistent 1/8 to 3/16 inch setback — is marked before a single cut. Then comes the fitting: in older homes especially, casing often has to be scribed to wavy plaster or drywall, back-cut so the face sits tight while the back edge follows the wall. This is slow, invisible work, and it is the main reason trim in Pekin’s older housing stock costs more to install well than trim in a new subdivision home where everything is flat and square.
Corners are cut, test-fit, and glued as well as nailed on good work, because a glued miter resists the winter shrinkage that opens painted corners. Nail holes are set and filled, seams are caulked with a fine, consistent bead — caulk is a finishing line, not a gap filler — and the casing is sanded, primed where needed, and painted as part of the room’s trim and painting sequence.
Timing gives a realistic sense of scale: a skilled finish carpenter cases a straightforward door in one to two hours including filling and caulking, and longer where walls are out of true. A whole house of 10–12 doors, cased on both sides, is typically three to five days of trim work. That is why casing is most economical when it is planned as a package — as part of a whole-home renovation or a full interior trim upgrade — rather than one doorway at a time. It is also why our custom carpentry team treats casing, baseboards, and crown as one coordinated package with one profile family, which we budget alongside the projects in our custom carpentry cost guide.
Door Casing Cost in Central Illinois
Costs below are typical Central Illinois ranges for 2026. They run below coastal pricing — in labor especially — and they assume standard interior doors in sound condition. Stain-grade hardwoods, built-up Victorian profiles, and out-of-square older walls all push toward the top of each range.
| Material | Material cost / linear ft | Material cost / door side (~20 ft) | Installed cost / door side |
|---|---|---|---|
| MDF (paint-grade) | $0.75 – $2.00 | $15 – $40 | $125 – $225 |
| Pine / poplar (paint-grade) | $1.00 – $3.00 | $20 – $60 | $150 – $300 |
| Wide Craftsman / farmhouse package (paint-grade) | $1.50 – $3.50 | $30 – $70 | $200 – $400 |
| Oak / stain-grade hardwood | $4.00 – $9.00+ | $80 – $180+ | $350 – $750+ |
For a whole home of 10–12 interior doors cased on both sides, a paint-grade trim package typically lands between $2,800 and $6,500 installed, including removal of the old casing and paint-ready finishing. Three things move the number most: the material grade (stain-grade hardwood can double the package), whether the old casing comes off cleanly or brings plaster repair with it, and how much scribing the walls demand.
A note on estimates: any contractor quoting casing should be measuring per door and asking about finish — a single flat “per door” price given without seeing the house is a guess, and guesses in trim work become change orders.
Frequently Asked Questions
What is the difference between door trim and door casing?
They are used almost interchangeably in everyday speech. Strictly, “trim” is the general word for all the finish moulding in a room — baseboards, crown, and casing together — while “casing” is specifically the trim that frames a door or window. When a contractor quotes “door trim,” they mean the casing around that door.
What are some modern casing options for doors?
Flat square-edge casing is the main modern option, usually 2.5 to 3.5 inches wide, mitered tightly, and painted either to blend with the wall or in a deliberate contrast color. The extreme version is the trimless look, where the jamb finishes flush with the drywall — striking, but it has to be planned during framing and drywall, so it suits new construction and full renovations.
What door trim looks best?
The one that matches your home’s architecture and the rest of its trim. Craftsman casing looks best in a bungalow, Colonial in a postwar traditional home, and flat casing in a contemporary one — and a consistent profile at the right width looks better than a “fancier” profile that fights the house. If in doubt, wider and simpler beats narrower and more ornate in most homes being built or remodeled today.
What is the standard width for door casing?
Most casing falls between 2.25 and 3.5 inches. Older and formal homes run wider — 3.5 to 5.5 inches for Craftsman and farmhouse packages, up to 6 inches for Victorian profiles. Width should follow ceiling height and baseboard size, not just taste: taller rooms and taller baseboards need wider casing to stay in proportion.
Should door casing match your baseboards?
They do not need to be the same profile, but they should be the same family, the same finish, and in proportion — baseboard equal to or slightly more substantial than the casing. Matching paint color and sheen matters more than matching shape; a Colonial casing beside a Colonial-era baseboard in the same white reads as one intentional package.
Can you mix door casing styles in one house?
You can step the detail down — full treatment at the entry, simpler in closets — but mixing different profile families in connected rooms looks like a series of separate repairs rather than one home. When a remodel changes the casing in part of the house, either match the existing profile or plan to re-case the connected rooms so the change happens at a natural boundary.
How much casing do I need for one door?
About 20 linear feet per side for a standard interior door — two legs and a head, with cutting waste included — so roughly 40 linear feet for a door cased on both sides. Measure each door rather than multiplying blindly: tall doors, wide farmhouse packages, and rosette-block installations all change the count slightly, and running short mid-job costs more than a spare length on the rack.
Should casing be painted or stained?
Paint is right for most homes: it suits paint-grade materials, unifies casing with baseboards and crown, and is far easier to touch up. Stain makes sense when the casing is part of the home’s wood architecture — Craftsman interiors especially — and the material is a genuine stain-grade hardwood. Never pay for stain-grade wood you intend to paint, and never expect MDF to take stain; it cannot.
The Trim That Ties the House Together
Casing is a few hundred dollars of material that decides whether doorways look finished or forgotten. Choose the profile that belongs to your house, size it to the room, keep one family running through the whole home, and have it installed by someone who treats a 1/8-inch reveal as worth measuring. Done that way, trim stops being an afterthought and becomes the detail visitors notice without ever knowing why.
Planning new trim for your home?
Whether it is part of a remodel or an older Central Illinois home whose casing deserves to be matched rather than replaced, our custom carpentry team will walk the house with you, measure every opening, and give you a straight number for the whole package.