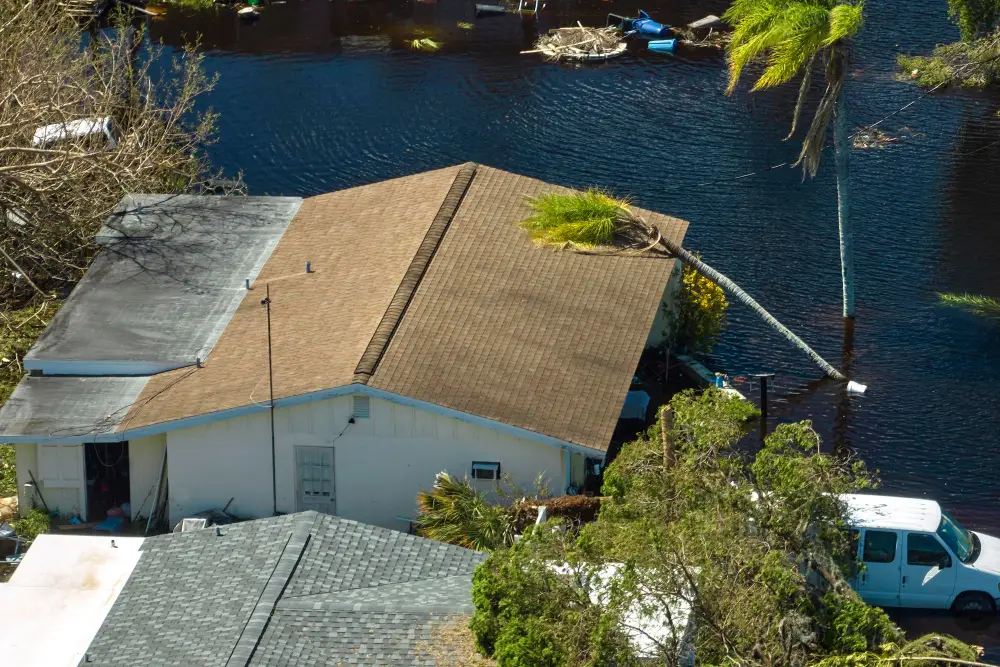
A bad storm leaves more than debris in the yard. It leaves homeowners standing in the driveway trying to figure out what just happened to their roof, their siding, and sometimes their living room. The storm damage repair process follows a fairly predictable path once you know it, but the hours and days right after a storm are confusing, and the decisions made during that window affect both the repair quality and the insurance payout. Move through the steps in the right order and the recovery is mostly paperwork and patience. Move through them in the wrong order, or too slowly, and a roof repair grows into a mold and drywall project nobody budgeted for. This guide walks the full process from the moment the wind dies down to the day the last shingle goes on, including what it costs, what insurance covers, and the contractor traps to avoid.
Why Storm Recovery Goes Wrong for Homeowners
Storm damage creates a perfect storm of its own: an emotional homeowner, a damaged home, an unfamiliar insurance process, and a wave of contractors competing for the work, some of them from out of town and gone before warranty season. Mistakes cluster in three places. Homeowners clean up before documenting, which weakens the claim. They delay mitigation, which lets water spread and gives insurers grounds to reduce payment. And they sign with the first contractor at the door, which is how deposit scams and abandoned jobs happen.
Every one of those mistakes is avoidable with sequence. The process below is the sequence: secure, document, mitigate, file, scope, repair. Each step protects the one after it.
[TRUST BADGES: licensed and insured, local restoration contractor, insurance claim experience]
Step 1: Make Sure the House Is Safe
Before anything gets photographed or repaired, the property has to be safe to be in. Stay away from downed power lines and report them to the utility. If you smell gas, leave the house and call the gas company from outside. Look for sagging ceilings, which can mean water pooling above, and for trees or limbs resting on the roof or lines. If the structure took a major hit, stay out until a professional clears it.
Then shut down what needs shutting down. Water near electrical fixtures means killing power to that area at the breaker. A broken pipe means closing the main water valve. These two moves keep a storm problem from becoming a fire or flood problem.
Step 2: Document Everything Before Touching Anything
Your insurance claim is built on evidence, and the best evidence gets captured before cleanup starts. Photograph and video every area of damage: the roof from the ground, siding, gutters, windows, fencing, interior ceilings and walls, and damaged belongings. Wide shots establish context, close-ups show severity. Note the date and time of the storm and save local news coverage of the weather event, since it supports the claim. Keep damaged items until the adjuster has seen them or approved disposal.
Step 3: Stop the Damage From Spreading
Insurance policies require homeowners to take reasonable steps to prevent further damage, a duty called mitigation, and skipping it can reduce your payout.
Emergency Tarping & Board-Up
A roof with missing shingles or punctures needs a tarp before the next rain, and broken windows and doors need boarding. Most restoration contractors offer 24-hour emergency tarping and board-up, and these costs are typically covered by your policy, so save every receipt. Do not attempt roof work yourself after a storm. Wet decking, hidden damage, and ladders account for a large share of post-storm injuries.
Dry Out Any Water Intrusion
Water that got inside starts feeding mold within a day or two. Extract standing water, pull back wet carpet, and run fans and dehumidifiers. For anything beyond a small intrusion, professional water mitigation with commercial dryers and moisture meters is worth the call, and it is also typically covered.
Step 4: File the Claim & Work the Inspection
Call your insurer or file online as soon as the emergencies are handled. Storms generate thousands of claims at once, processed largely in order received, so speed matters.
The insurer assigns an adjuster to inspect the property. Before that visit, have a contractor’s damage assessment in hand, because adjusters work fast and can miss what a trained roofer catches: hail bruising on shingles, lifted flashing, wind-creased siding. Many contractors will meet the adjuster on site to walk the damage together, which keeps the scope honest. The adjuster then produces a scope of loss listing what the insurer agrees to pay for. Read it line by line, and know that supplements for missed damage are routine, not adversarial, when backed by photos and documentation.
[BEFORE/AFTER GALLERY: storm-damaged roof and siding, then the completed restoration]
Step 5: Choose the Repair Contractor Carefully
Storms attract out-of-town crews who knock on doors, work fast, and disappear before warranty issues surface. Protect yourself with filters: hire local companies with a physical address, verifiable license and insurance, and references you can call. Walk away from anyone demanding a large cash deposit, pressuring a same-day signature, or offering to cover your deductible, which is insurance fraud in most states. Get the full scope of work in writing, matched against the insurance scope, before work begins.
Step 6: The Repairs, Outside In
The building envelope gets restored before interior finishes, since there is no point patching a ceiling under a roof that still leaks. Roofing comes first, then gutters, siding, windows, and exterior trim. Once the envelope is tight and moisture readings confirm the structure is dry, interior work proceeds: insulation, drywall, paint, flooring, and trim. A final walkthrough confirms every line of the scope got completed, and your insurer may release the final payment portion, called recoverable depreciation, only after receiving proof of completion, so submit that paperwork promptly.
What Storm Damage Repairs Cost
Insurance covers most storm repairs after the deductible, but knowing the numbers helps you read estimates and scopes.
| Repair Item | Typical Cost Range | Usually Covered by Insurance |
| Emergency roof tarping | $300 to $1,000 | Yes |
| Board-up service | $200 to $800 | Yes |
| Water mitigation and drying | $1,500 to $5,000 | Yes, for storm-caused intrusion |
| Roof repair (localized) | $500 to $2,500 | Yes, less deductible |
| Full roof replacement | $9,000 to $25,000+ | Yes, when damage warrants |
| Siding repair or partial replacement | $1,500 to $8,000 | Yes, less deductible |
| Interior drywall, paint, flooring repair | $2,000 to $10,000 | Yes, when storm-caused |
| Tree removal from structure | $1,000 to $5,000 | Yes, when it struck the home |
Your out-of-pocket cost is typically the deductible, which on many newer policies is a percentage of the home’s insured value for wind and hail rather than a flat figure, so check your declarations page now rather than after the storm.
[FINANCING CTA BANNER: deductible financing and payment options available for storm repairs]
Frequently Asked Questions
What should I do first after storm damage?
Confirm the house is safe: avoid downed lines, check for gas smell, and look for sagging ceilings. Then photograph everything before cleanup, arrange emergency tarping or board-up, and file your insurance claim. That order protects both your family and your payout.
How long does the storm damage repair process take?
Small claims with prompt adjuster visits can finish in a few weeks. After a regional storm, the same process commonly stretches 2 to 6 months because adjusters, materials, and crews are stretched thin. Fast documentation and filing on your end shortens the controllable part.
Will insurance cover all my storm damage?
Standard homeowner policies cover sudden storm damage from wind, hail, and falling trees, less your deductible. Flooding from rising water requires separate flood insurance, and damage traced to neglected maintenance can be excluded. Your mitigation costs, like tarping and drying, are typically covered, so keep receipts.
Should I get a contractor estimate before the adjuster comes?
Yes. A contractor’s documented assessment gives the adjuster something concrete to work with and catches damage adjusters commonly miss, like hail bruising and lifted flashing. Many contractors will meet the adjuster on the roof to walk the damage together.
How do I avoid storm-chaser contractor scams?
Hire local companies with a physical address and history, verify license and insurance, and call references. Refuse large upfront cash deposits, same-day signature pressure, and any offer to waive or cover your deductible, which is fraud in most states.
Related Reading & Services
- Restoration & Repairs services
- [Roof Leaks After Storms: What to Do First](INTERNAL LINK: roof leak after storm blog)
- [Mold Risks After Water Damage in Homes](INTERNAL LINK: mold after water damage blog)
- Exterior Remodeling services
[REVIEW SNIPPET: homeowner quote about fast response and insurance help after storm damage, with first name and town]
Storm Damage in Central Illinois? Start With One Call
The first 48 hours after a storm decide how the next three months go, and a local team that handles tarping, documentation, the insurance walk-through, and the full repair keeps you from coordinating five companies during a stressful week. If your home in Pekin, East Peoria, Morton, Washington, or the surrounding area took storm damage, contact us for emergency service and a free assessment or call (309) 241-9593 now.